Building Figma Multiplayer Cursors
Real-time applications have always fascinated me. The idea that you can connect people from all over the world in a single web application to chat, edit files, or play games with near instant feedback is simply amazing. Having very little experience with what goes into building real-time applications I was interesting in re-building a key feature of collaboration within Figma: multiplayer cursors.
While this feature may seem relatively simple given the result is just some cursors that move around on the screen, the implementation requires a non-trivial amount of code to build. To get started with building our application, let’s first outline the main requirements for the project:
- Low-latency updates between connected users
- Cursors are added when new users connect to the application
- Cursors are removed when users disconnect from the application
- When a user connects, they immediately see all the users who are currently connected
- The client automatically reconnects to the server if the connection is unexpectedly closed
A very naive approach to this problem would be to use a polling technique where the client periodically sends it’s cursor position to the server and receives the positions of other connected users. This would result in a great deal of lag due to the polling delay as well as the time required for each HTTP request. WebSockets are much better suited for this application, but they are more complex to implement.
Before we can implement WebSockets in our application, we probably should build the core application itself! We’ll get back to WebSockets later in this post, as that is certainly the most interesting part of this build, but let’s get some of the basics knocked out first.
Scaffolding the application
This application is very simple, but I’m building it in a way that could fit easily into an existing React application. Nothing in this is React specific, so everything could be done with another framework or vanilla HTML and JavaScript. Checkout the final thoughts section for links to the source code on GitHub for both this React version as well as other frameworks. The frameworks and tools I’m using for this application include:
- Tailwind CSS for styling
- Vite for bundling
- Bun as the server
In addition to these frameworks and tools, I’m using several packages which you can install using your npm or your favorite package manager.
npm install @faker-js/faker clsx color-hash
npm install -D @types/bun @types/color-hash
Starting at the root of the application, there are two primary components
we need to build: Cursors and Tracker. The Cursors component will be
responsible for showing the cursors of other users that are connected
and the Tracker component will be responsible for sending updates from
us to other users.
function App() {
  return (
    <>
      <Cursors />
      <Tracker />
    </>
  )
}
Tracking cursor movement
Let’s start with the implementation of Tracker as it’s the simpler of the
two. This component will need to listen to changes to cursor position and
publish that information to the server so other users can receive the
updated cursor position. We can do this by registering a
mousemove
listener inside of a useEffect hook.
export function Tracker() {
useEffect(() => {
function handleMove(event: MouseEvent) {
console.log(`X:${event.clientX}, Y:${event.clientY}`)
}
window.addEventListener("mousemove", handleMove)
return () => {
window.removeEventListener("mousemove", handleMove)
}
}, [])
return null
}Now that we are listening to mousemove events, you should see logs in the
browser console every time that you move your cursor in the app. This isn’t
that useful since that only shows up for us, but it’s a great first step.
We’ll fill in the rest later in this post after we setup our WebSocket so
we can publish our cursor position to other users.
Supporting mobile devices
Before moving on, let’s take a moment to consider mobile devices. While
this code works great for a laptop or desktop computer, if you try to run
it on a phone or tablet, you’ll notice that it doesn’t print anything to
the console. Mobile devices don’t actually fire mousemove (or related
mouse* events) when you touch or drag your finger around the screen. This
is because mouse and touch interactions are fundamentally different, so
they cannot both be represented by the same event object.
One of the key differences between mouse and touch events is that touch
events can have more than one set of coordinates given that you can touch
the screen with multiple fingers at the same time. You can access each set
of coordinates via the event.touches property which is a list of
individual touches each of which contain their coordinates.
For our application, we don’t really care if the user is touching the
screen with one finger, or three fingers, in both cases we only want to
show a single cursor to other users. So while there may be more than one
touch in event.touches, we can simply use the first touch in the list to
track cursor (or I suppose more properly finger) movement.
useEffect(() => {
function handleMove(event: MouseEvent | TouchEvent) {
const source = "touches" in event ? event.touches[0] : event
console.log(`X:${source.clientX}, Y:${source.clientY}`)
}
window.addEventListener("mousemove", handleMove)
window.addEventListener("touchmove", handleMove)
return () => {
window.removeEventListener("mousemove", handleMove)
window.removeEventListener("touchmove", handleMove)
}
}, [])Displaying cursors
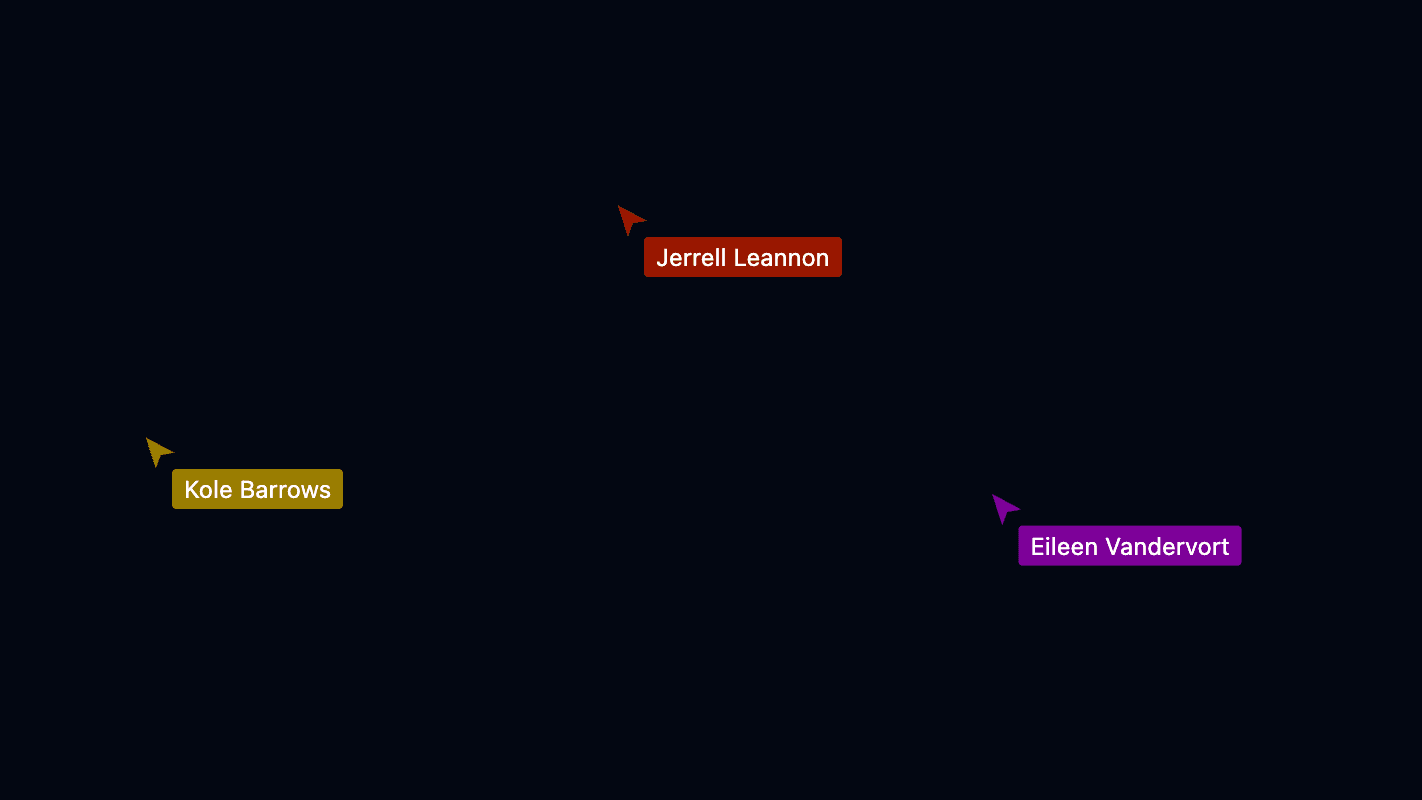
To display the cursors of other users, we need to build two new components: a component which displays a user’s cursor on the screen, and a component that manages all the cursors including adding cursors when users connect and removing cursors when users disconnect.
For our single Cursor component, we want to show both an
arrow shape
and the user’s name so we know which cursors belong to who. To give our
application a bit of color, I’m using the
color-hash package to generate a random color
based on the name of the user. We’ll use this color as the background of
the arrow and the user’s name.
The position of the cursor is controlled by the
custom properties
--x and --y which are used to translate the cursor from it’s fixed
position on the page. The use of
viewport units
(vw and vh) allows us to express the coordinates of each cursor as a
percentage of the page width/height, rather than a fixed offset. This is
important as each user who visits our application may have different screen
sizes, but the positions of each cursor should match the relative position
on the source device.
The Cursor component also uses
forwardRef which we’ll need
later when updating cursor position from incoming WebSocket messages.
export interface ClientConnection extends ServerConnection {
ref: React.RefObject<HTMLDivElement>
}
interface CursorProps {
connection: ClientConnection
}
export const Cursor = forwardRef<HTMLDivElement, CursorProps>(
function Cursor({ connection }, ref) {
const hash = new ColorHash({ lightness: 0.3 })
const color = hash.hex(connection.username)
return (
<div
ref={ref}
className={clsx(
"fixed flex translate-x-[--x] translate-y-[--y] gap-1 rounded text-xs",
// If we don't have any initial coordinates for the user, hide this
// cursor. This happens when a new client first connects.
connection.coords.x ? "visible" : "invisible",
)}
style={
{
"--x": `${connection.coords.x}vw`,
"--y": `${connection.coords.y}vh`,
} as React.CSSProperties
}
>
<Arrow color={color} />
<span
className="relative -left-1.5 top-4 rounded-sm px-1.5 py-0.5 text-white"
style={{ backgroundColor: color }}
>
{connection.username}
</span>
</div>
)
},
)Now that we can display a single cursor, it’s time to display them all!
Let’s create a Cursors component which will display a single Cursor for
all connected users. We will store the cursors as an object with the keys
representing a user’s connection id (more on that later), and the value
representing information about the user’s connection such as their name,
last known coordinates, and a
ref that we will
use later to update cursor position on the fly. We can then use
Object.values to get a list of connections to render the individual
Cursor components.
type ConnectionMap = Record<string, ClientConnection>
function makeClientConnection(conn: ServerConnection): ClientConnection {
return { ...conn, ref: createRef<HTMLDivElement>() }
}
export function Cursors() {
const [cursors, setCursors] = useState<ConnectionMap>({})
useEffect(() => {
function handleMessage(e: MessageEvent) {
// ...
}
return subscribe(handleMessage)
}, [cursors])
return (
<>
{Object.values(cursors).map((connection) => (
<Cursor
key={connection.id}
ref={connection.ref}
connection={connection}
/>
))}
</>
)
}We can see now why the Cursor component needed to use forwardRef as we
are passing the ref stored in our connection object to the cursor to allow
updating it’s position on the fly. The majority of the logic for this
component will be implemented in the handleMessage function which we will
dive into later in this post!
Introduction to WebSockets
At this point, the scaffolding for our project is setup, and we can now begin the work of connecting users via WebSockets. While there are many great WebSocket libraries such as socket.io, in this application we are going to setup our WebSocket from scratch to better understand how WebSockets work and the low-level APIs the browser provides for using them. However, before we can implement our first WebSocket, let’s take a step back and understand how WebSockets actually work.
WebSockets are persistent HTTP connections that allow bi-directional communication between the client and server. By maintaining an open connection, they are able to achieve very low-latency which is exactly what we need given the high number of messages being passed between clients as users move their cursors and send position updates to other clients.
Establishing a WebSocket connection is a bit different from a typical HTTP connection, as shown in this diagram:
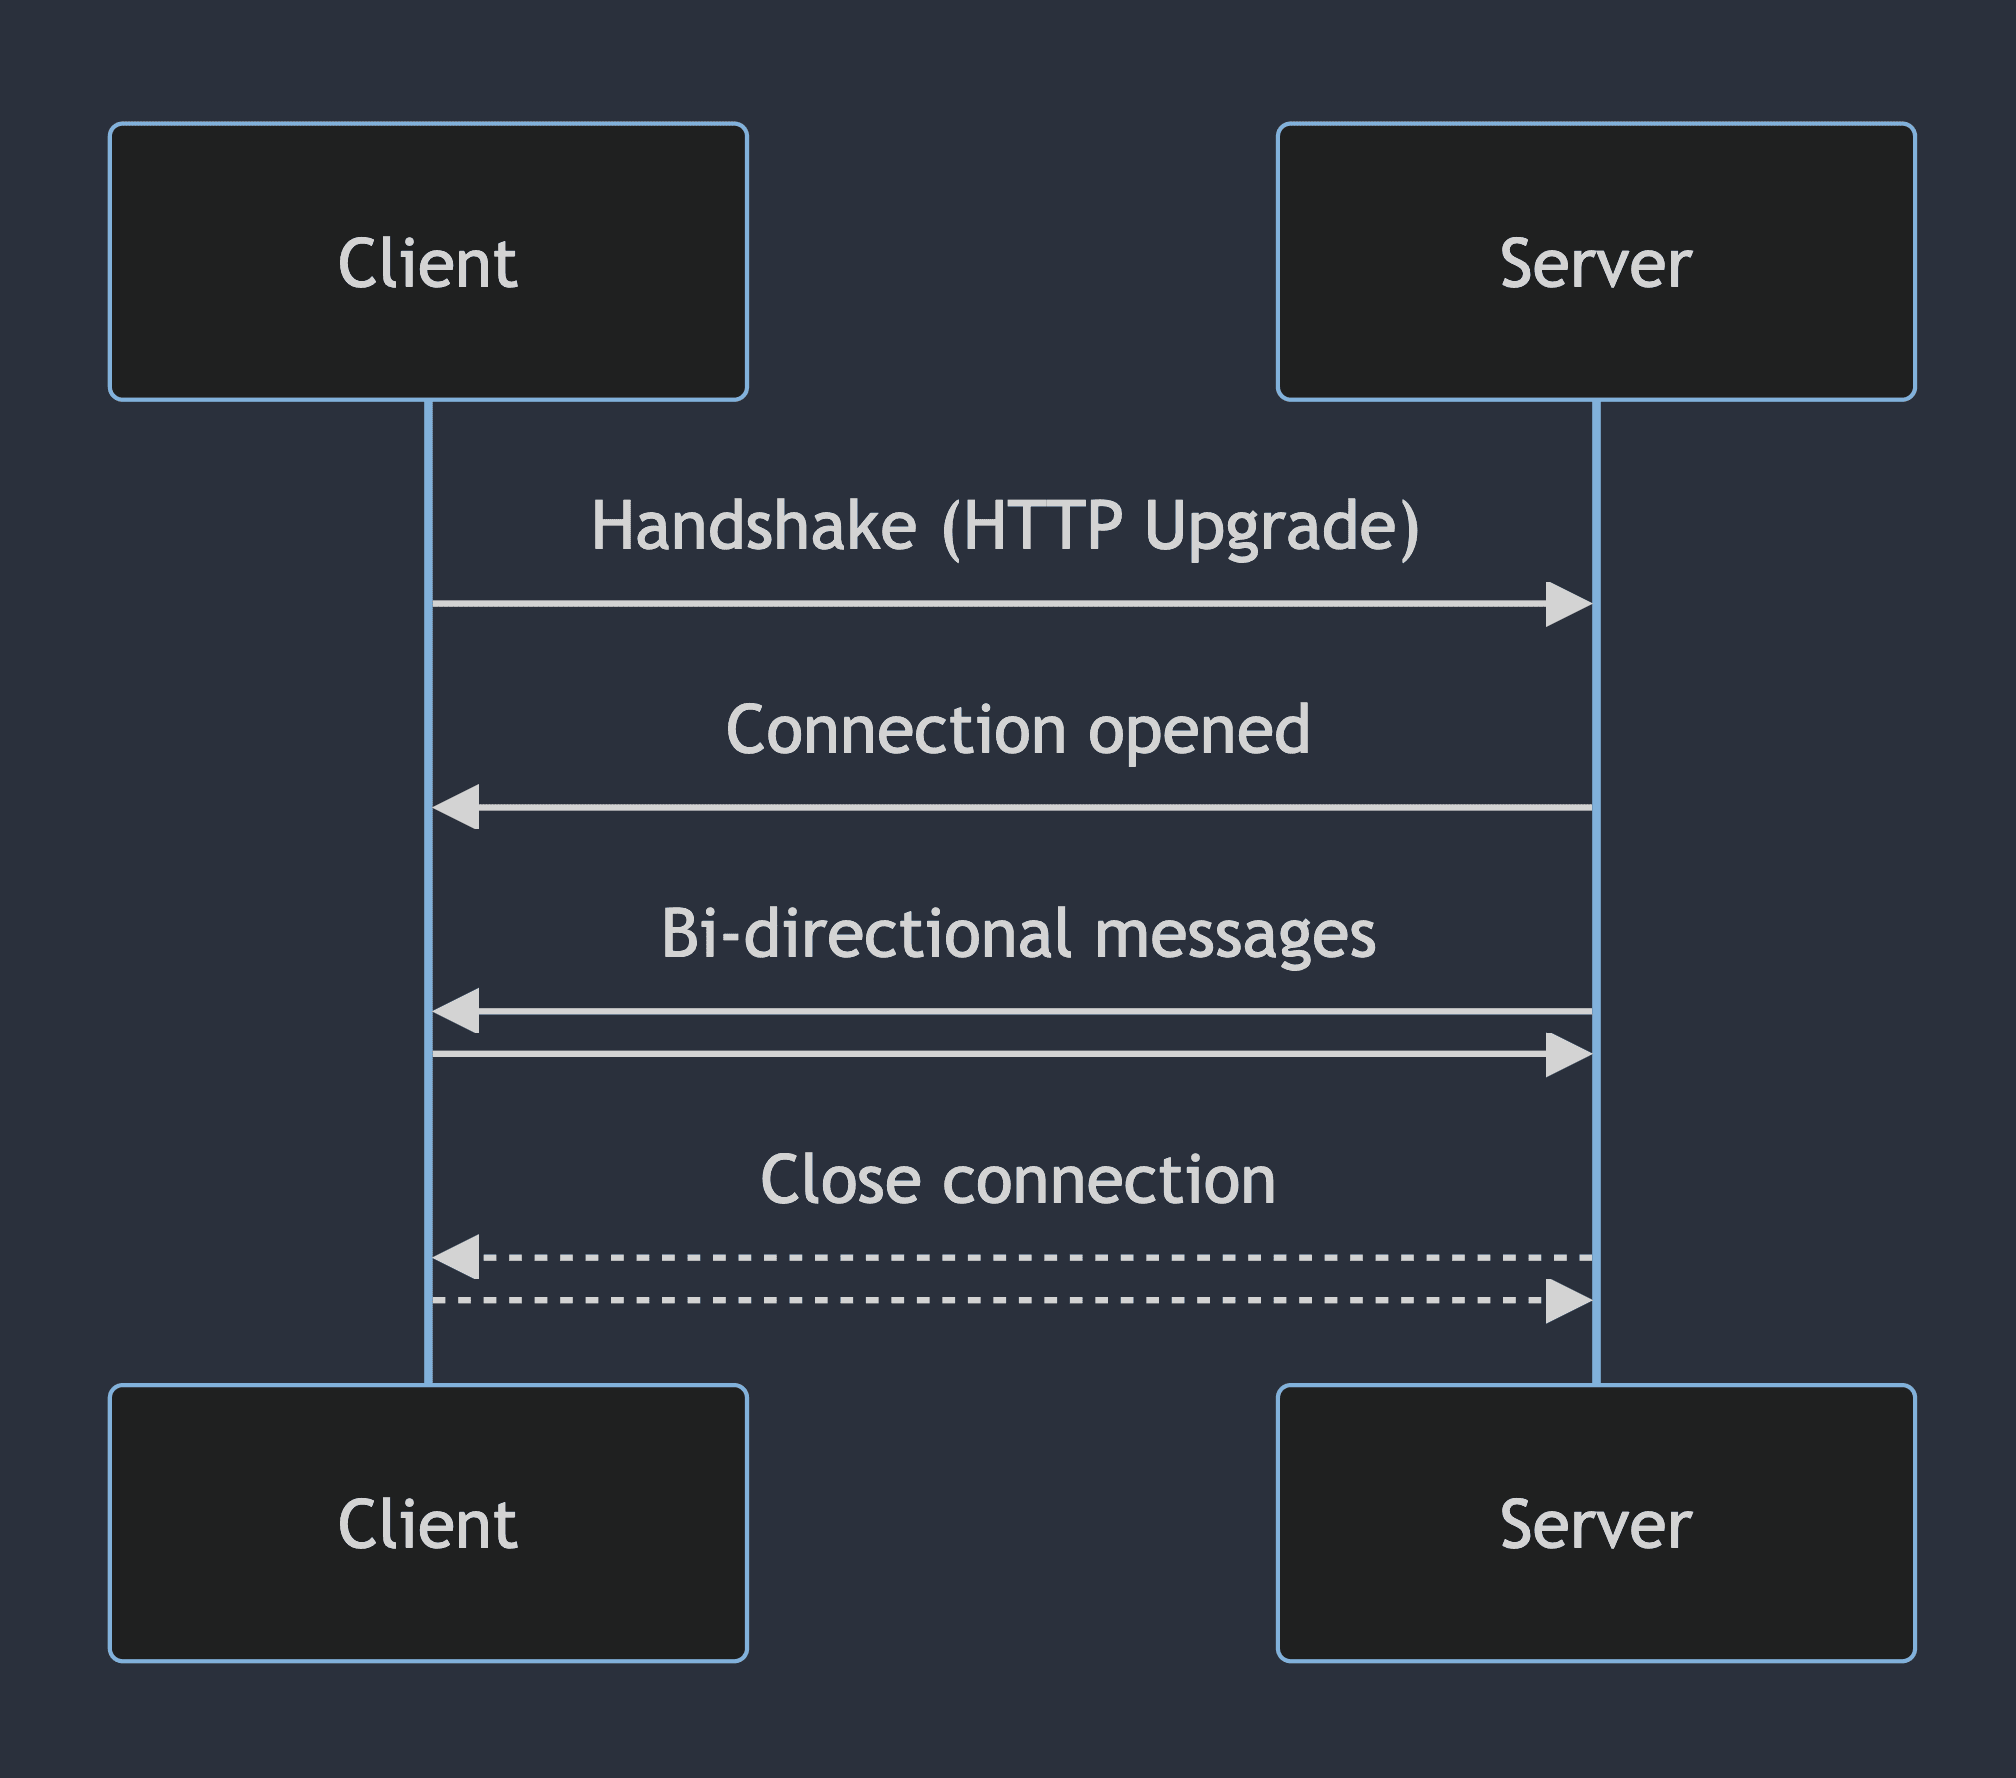
Creating the connection starts like any other HTTP request. However, when
the server receives the request, it will respond with a status code of
101 Switching Protocols and return two response headers to indicate to
the client that the request is being upgraded to a WebSocket connection.
Connection: Upgrade
Upgrade: websocket
After the client has successfully received this response, the WebSocket connection has been made and messages can now be passed from the client to the server or vice versa.
Setting up the WebSocket server
For this application, I decided to use Bun as the WebSocket server as it makes the setup extremely simple. The ws library is an extremely popular WebSocket implementation for Node if you want to go that route, but for this application, the simpler the better.
Let’s get started with some boilerplate.
const server = Bun.serve<{ connectionId: string }>({
port: 8081,
fetch(req, server) {
const url = new URL(req.url)
if (url.pathname === "/chat") {
const name = url.searchParams.get("name")
const connectionId = Math.random().toString(36).slice(2)
const success = server.upgrade(req, { data: { connectionId } })
return success
? undefined
: new Response("WebSocket upgrade error", { status: 400 })
}
return new Response("Hello world")
},
websocket: {
open(ws) {},
message(ws, raw) {},
close(ws) {},
},
})When we create a server using Bun.serve, all traffic will flow through
the fetch method that we define. Inside this function we use the
server.upgrade method to upgrade to a WebSocket connection. When we do
this, Bun handles the details of sending the 101 Switching Protocols
response that we saw in the previous section and attaches the proper
response headers to upgrade to a WebSocket connection.
When we upgrade the request, Bun allows us to set “contextual data” that is associated with the WebSocket connection. We can use this to create a unique id for each connection which allows us to associated data such as the username and cursor coordinates that we can update as the user sends future messages.
Storing coordinates
With the basic server setup, we can now work on making it functional. Let’s start by creating a map of connection ids to the associated connection data.
interface ServerConnection {
coords: { x: number; y: number }
id: string
username: string
}
const connections = new Map<string, ServerConnection>()Now, inside of the fetch function of the server, after creating the
connectionId, we can add our new connection to the map with the username
and initial coordinates which we set to 0,0. While we could have the
client send the initial cursor position when it creates the WebSocket
connection, initializing to 0,0 is a bit simpler for our use case.
connections.set(connectionId, {
  id: connectionId,
  coords: { x: 0, y: 0 },
  username: name || "Anonymous",
})
Subscribing to messages
Now that we have our connection information stored, let’s make sure the
client is able to receive messages from other users and also publish a
message to other users indicating that we’ve connected to the server. To do
this, we’ll modify the websocket.open() method:
const GROUP_ID = "cursors"
const server = Bun.serve({
// ...
websocket: {
open(ws) {
// If the user isn't found, something went wrong so let's just bail
const connection = connections.get(ws.data.connectionId)
if (!connection) return
// Subscribe the new user to the group
ws.subscribe(GROUP_ID)
// Notify other users of the new user
ws.publish(GROUP_ID, JSON.stringify({ type: "connect", connection }))
},
},
})We also should ensure that when a user loses connection to the server,
either by closing the tab or network issues, their connection will be
removed from the server and other users will be notified that they are no
longer connected. We can use the websocket.close() method to handle these
scenarios:
const server = Bun.serve({
// ...
websocket: {
close(ws) {
// Remove the user from the list of users
connections.delete(ws.data.connectionId)
// Unsubscribe the user from the group
ws.unsubscribe(GROUP_ID)
// Notify other users that this user has disconnected
server.publish(
GROUP_ID,
JSON.stringify({
type: "disconnect",
connectionId: ws.data.connectionId,
}),
)
},
},
})Updating cursor position
Now that we have a connection established, we can update our server to
notify other users when a user is moving their cursor. We can do this
inside of the websocket.message() method:
const server = Bun.serve({
// ...
websocket: {
message(ws, raw) {
const message = JSON.parse(
typeof raw === "string" ? raw : new TextDecoder().decode(raw),
)
switch (message.type) {
case "move": {
// Ignore users we don't recognize
const connection = connections.get(ws.data.connectionId)
if (!connection) return
// Update the saved coordinates for this user
connections.set(ws.data.connectionId, {
...connection,
coords: message.coords,
})
// Send the updated coordinates to all other users
ws.publish(
GROUP_ID,
JSON.stringify({
type: "move",
connectionId: ws.data.connectionId,
coords: message.coords,
}),
)
break
}
}
},
},
})Handling the info event
There is one final event we need to implement: info. This event is used
by the client when it first connects to get the list of currently connected
users to display on the screen. Ideally we would send this event
automatically when the user connects, but we cannot send messages to the
client immediately as the client has yet to fully connect.
Implementing the info event is quite simple, it converts the connection
map into a list of connections and removes the current user’s connection
from the list. The result is a list of other users connected to the server.
switch (message.type) {
case "info": {
ws.send(
JSON.stringify({
type: "info",
connections: [...connections.values()].filter(
(connection) => connection.id !== ws.data.connectionId,
),
}),
)
break
}
}Creating a WebSocket connection on the frontend
The code for creating a WebSocket connection on the frontend is a bit more complex than much of the rest of the code we’ve see so far, so let’s break it up into some small pieces. First, we need to setup some variables that we’ll use for managing our WebSocket connection:
import { faker } from "@faker-js/faker"
type Subscriber = (event: MessageEvent) => void
const subscribers: Set<Subscriber> = new Set()
let socket: WebSocket | null = null
const name = `${faker.person.firstName()} ${faker.person.lastName()}`
const url = `ws://${location.hostname}:8081/chat?name=${name}`The important parts of this code block are creating a set of subscribers which we will publish messages to when they are received from the server. We also need to store our WebSocket as a global variable for our application. The rest is just generating a fake name and creating the WebSocket URL that we will be connecting to.
Next, we can build a connect function which will initiate the connection
to our server:
function connect() {
socket = new WebSocket(url)
socket.addEventListener("message", (event) => {
subscribers.forEach((callback) => callback(event))
})
socket.addEventListener("close", () => {
console.error("Lost connection to server. Retrying in 1 second...")
setTimeout(connect, 1000)
})
}
connect()After creating the WebSocket, any new messages that are received will be
published to all the active subscribers. I’ve also implemented
auto-reconnect logic when we receive a close event by waiting for 1
second before re-connecting to the server. This can happen if the server
restarts or our client loses network connectivity. Without auto-reconnect,
the client would have to refresh the page which would not provide a great
user experience.
Finally, we can setup two utility functions to send and subscribe to messages:
export function send(message: Record<string, unknown>) {
if (socket?.readyState !== WebSocket.OPEN) return
socket.send(JSON.stringify(message))
}
export function subscribe(callback: Subscriber) {
subscribers.add(callback)
return () => {
subscribers.delete(callback)
}
}In the send method, we’ll check to ensure the WebSocket is open (this
prevents errors when the WebSocket is initiating the connection or
re-connecting) and then we can call socket.send with our message. The
subscribe method will add a new subscription function to receive messages
and return a callback function to unsubscribe from receiving messages.
We’ll use this a bit later to create a React hook to receive messages from
other users.
Sending move events to other users
Now that we have our WebSocket connection setup, we can update our
handleMove function to send messages to other users with our new cursor
position. We can do this by using our send method that we created to send
the x/y coordinates of our cursor.
function handleMove(event: MouseEvent | TouchEvent) {
const source = "touches" in event ? event.touches[0] : event
if (!source) return
send({
type: "move",
coords: {
x: (source.clientX / window.innerWidth) * 100,
y: (source.clientY / window.innerHeight) * 100,
},
})
}One thing you’ll notice in this code block is that we are dividing
clientX and clientY with window.innerWidth and window.innerHeight
respectively. This is to account for different users having different
screen sizes, so we actually want to represent the coordinates as a
percentage of the screen rather than a fixed pixel size. This will work
nicely with our Cursors component since we set it up to use vw and vh
units.
Receiving move events from other users
Just as important as sending our cursor position to other users is receiving cursor position updates from other users. There are four events we need to respond to:
info- Received when you first connect to the WebSocket server. This event includes the list of all currently connected users.connect- Received when a new user connects.disconnect- Received when a user disconnects.move- Received when a user moves their cursor. This includes the updated cursor position.
We can update the handleMessage function that we stubbed out earlier to
handle each of these events. The code for each is fairly self explanatory,
with the move event being the most complex of the four by using the
setProperty function to update the cursor position. By using a
combination of refs and CSS properties we are able to very efficiently
update cursor position without re-rendering the entire component tree for
every single move event.
function handleMessage(e: MessageEvent) {
const data = JSON.parse(e.data)
switch (data.type) {
case "info":
setCursors(
data.connections.reduce<ConnectionMap>((acc, connection) => {
acc[connection.id] = makeClientConnection(connection)
return acc
}, {}),
)
break
case "connect":
if (!cursors[data.connection.id]) {
setCursors((prev) => ({
...prev,
[data.connection.id]: makeClientConnection(data.connection),
}))
}
break
case "disconnect":
setCursors((prev) => {
const { [data.connectionId]: _, ...next } = prev
return next
})
break
case "move": {
const cursor = cursors[data.connectionId]
const { x, y } = data.coords
if (cursor && cursor.ref.current) {
cursor.ref.current.style.visibility = "visible"
cursor.ref.current.style.setProperty("--x", `${x}vw`)
cursor.ref.current.style.setProperty("--y", `${y}vh`)
}
}
}
}We also need to make a small change to our WebSocket initialization code.
When the socket is first opened, we need to send the info message to
receive the list of open connections from the server.
socket.addEventListener("open", () => {
  socket?.send(JSON.stringify({ type: "info" }))
})
And with that last piece of code, we should have a fully working application!
Final Thoughts
Wow, that was a lot! If you made it this far, thank you for reading and taking the time to explore the wonderful world of real-time applications! This project was great fun to build, and my only regret is not finishing this post earlier 😂
There are plenty more goodies in the full source code repo for this project including implementations for other frameworks! Definitely check them out if you want to explore more, sometimes it’s easier to look at the full source code rather than the chopped up pieces in a blog post. Cheers!